Table of Contents
Installing roof heat cable on a metal roof can shield your home from the damaging effects of ice and snow buildup. Thanks to these thorough instructions, you’ll be able to install the product with confidence, protecting your roof and property from the elements during the winter. We’ll also review some maintenance tips to ensure your heat cable system keeps functioning well for a very long time.
Assess Your Roof:
The first step is to thoroughly examine your metal roof for any areas where snow or ice may accumulate. Problem areas, including valleys, eaves, and gutters, usually need extra attention. Note any prior damage or impediments that could cause the installation to be delayed or impeded. Recognizing potential problem areas beforehand allows for designing more effective heat cable architecture to address them.
Select the Right Cable:
Selecting the appropriate heat wire is essential if you want your roof to be adequately protected. Consider factors such as the wire’s length, flexibility, and capacity for self-regulation. Use an automated heat wire to prevent overheating and inefficient performance. Consider the wattage and voltage requirements of the cable further to ensure compatibility with the electrical system in your house.
Prepare the Roof Surface:
All debris on the roof must be removed before installing the heating cables for the roof. Remove dirt or leaves with a sweep or brush to guarantee a flawless installation. Ensure the roof is dry for the best adhesion of the heat wire. Before continuing with the installation, ensure the roof is free of degradation or damage.
Plan the Installation Layout:
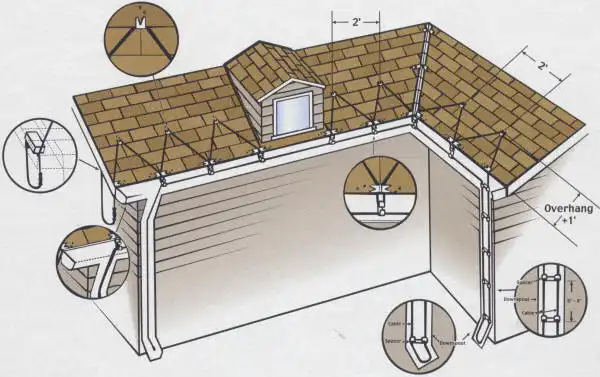
Determine the desired location for the heat wire on your roof. Find the possible locations for the cable installations, being especially mindful of high-traffic areas such as valleys, gutter lines, and roof margins. Generally, the ideal option is a triangular pattern that zigzags from the roof’s edge towards the warmer areas. Consider the length and power of the cable to provide enough coverage and effective ice melting.
Begin Installation:
First, follow the drawing and attach the heating cable to the roof’s edge.
Use clamps or straps specifically designed for metal roofing to secure the cable in position. Ensure you place the wire evenly and avoid crossing over or overlapping it. Take care not to submit the wire to abrupt bends or twists that might limit its lifetime or decrease efficiency.
Install in Valleys:
It would help if you took additional care with roof valleys since they are prone to ice and snow accumulation. Running the hot wire three or four feet into the valleys is the most excellent defense against ice damming. Ensure the wire is evenly spread across the valley to prevent it from sagging or falling.
Connect the Cable:
After everything is arranged, you may connect the heating wire to the power supply. Plug the cable into an exterior outlet equipped with a GFCI to ensure it is safe and compliant with electrical regulations. Extension cables and power strips should be avoided since they cannot protect sufficiently against electrical hazards. Before inserting the cable, ensure it is receiving power and heating up properly.
Test the System:
Before completing the installation, verifying that the heating wire is functioning properly is crucial. Observe the snow and ice melting as they pass over the roof to ensure the mechanism functions. Check to see if the cable isn’t reaching the roof sufficiently or if there is any continuous ice buildup. You may need to reposition or rearrange the wire for excellent ice melting.
Control and Monitoring:
If your heat wire has a temperature controller, install it according to the manufacturer’s instructions. One way to save energy consumption and operating costs is to use a timer or programmable thermostat to only turn on the cable when necessary. Ensure the system operates correctly by monitoring it and adjusting it according to the ice level and weather.
Regular Maintenance:
By planning routine maintenance checks and inspections, you can keep your heat cable system operating at peak efficiency. Clear the roof of any dirt accumulation or other obstructions to maintain the heating system operating efficiently.
Cut and replace the cable if you see any damage, such as ragged wires or exposed insulation. Make sure the system is heating up properly and melting the ice regularly. It is an excellent idea to employ a qualified electrician or roofing contractor to do routine maintenance and safety checks on your heat cable system to ensure its safe and efficient functioning.
To sum up
It is advised to put roof heating cables on metal roofs to protect your property from the damaging winter weather. This will effectively stop snow and ice from building up. Your heat cable system will function smoothly and effectively for many years if you perform routine maintenance according to this guide’s directions.
Also Read: